Woodcarving, one of the oldest kinds of art, is an art form common to all cultures since the Stone Age, not least due to its universal availability, plasticity, and low costs. The only possible drawback is its perishability as a medium for sculpture. You also have to learn how to use wood chisels for carving.

Wood can degrade very quickly, being water absorbent and vulnerable to insects and airborne fungi. This led to the exclusive use of bronze, marble, and other materials for monumental works.
Carving Process
Wood carving tools include a special wood cutting knife, which is used for cutting and parking the wood, a roof with a curved edge used to produce holes and curves, a professional gouge called an ax with a U-fashioned handle, a straight-edge chisel for the lines and various mallets and hammers.
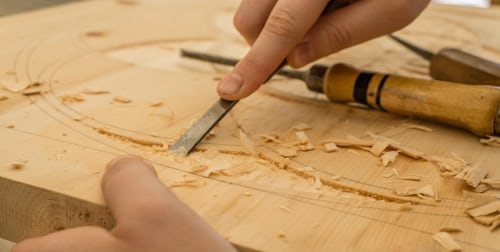
The sculptor starts by selecting a wooden block suitable to the shape and size of his design. He then cuts wood with gouges of varying sizes to an approximate form, which he refines with a range of tools such as veins and v-tools.
Once the work is finished, the sculptor lightens the surfaces by using devices such as rasps and rifflers and various grains of sandpaper. Finally, it stains walnut or linen oil to enhance and preserve the sculpture and then coats them into varnish, resin, or wax.
How To Use Wood Chisels For Carving
A sharp chisel of wood can cut mortises, break rough surfaces, chop corners and scrape off glue. We will teach you these methods and how to sharpen your chisel. The wood chisel is an essential part of your tool kit. We will show you how to make the most of it.
If you know how to use wood chisels for carving, the better.
You don’t always need one, but nothing beats a rasher-sharp chisel when it comes to constructing the recess to a hinge or aboard. We will introduce you to simple chiseling techniques and tips so you will be ready with a woodworking chisel set for any chiseling task.
Start with a new 3/4-in sharp—all-purpose chisel. Purchase one with an impact-resistant plastic handle (Keep your old dull chisel functional for work like cutting nails or scraping caulk). You can pound them without damaging them with a hammer. Good quality chisels don’t cost much, and buy three — 1⁄2-in, 3/4-in if you have a little extra cash. And 1-in. — a decent selection of beginners.
Also, new chisels have to be sharpened. With the first 1 in, paint the computer labels. Hone the bevel on the mask from the back of the chisel. Place your chisels in a sock or a special canvas roll between uses to protect the cutting edge. (See ‘Sharpening Basics’ below.)
How To Use Wood Chisels For Carving: Mortise
Face the bevel down. To cut thin slices, click or tap the chisel back. Monitor the depth with the handle raised and lowered.
Start recesses or mortises by outlining the area with a sharp utility knife or by perpendicular to the surface, creating a number of shallow chisel cuts. Skip this, and you are in danger of chipping wood outside the mortise. Then remove thin pieces with a hammer on the chisel, bevel side down, so the wood can be carved out into the perimeter.
Grain chiseling can often yield catastrophic results. If the grain flows more rooted into the wood, the chisel is too deep. When you notice like something is happening, stop and chisel from the opposite direction.
How To Use Wood Chisels For Carving: Paring
Pare thin wooden slices to flatten the recess floor. Hold the chisel back flat on the wood. To make slicing faster, rotate the chisel as you cut the blade to pass into an arc.
If, like a hinge mortise, the recess is open on one side, flatten the bottom with thin slices parted on the back, untouched side of the chisel held flat to the wood.
In general, face the bevel down while you’re shaving into a piece of wood. When you flatten a cut and reach from the ground, bring the bevel up and keep the chisel down firmly on the top.
How To Use Wood Chisels For Carving: Chop
Chop out large quantities of wood by cutting small amounts every time. Place the hammer on the chisel and cut in around 1/2. Then remove the piece from the end before proceeding. For this cut, your chisel must be sharp.
Place the chisel on one side and strike it harshly with a hammer to extract wood from the notches. It isn’t good work; another board covers the cut.
How To Use Wood Chisels For Carving: Chop and Pare
Cut a groove or a given, first sawing to the desired depth along both sides. Then smash the wood with your chisel in the center. Space the chisel cuts approximately 1/2 inches apart.
The chisel is withdrawn a little at once with a variety of shallow cuts rather than the chisel being pushed too deeply. Using a hammer or bridle for hard work or click your hand heel for lighter cuts or sharper cuts.
How To Use Wood Chisels For Carving: Scraping
Scrap glue joints or other imperfections from the wood projects with your back while face keeping the blade at a right angle to the wood. Support the blade with your fingers and press down while drawing the chisel to you to remove thin cuts.
Scraping requires a smooth, sharp point. Scrap the chisel tip cleanly without leaving any marks in the wood.
How To Use Wood Chisels For Carving: Straight Edges

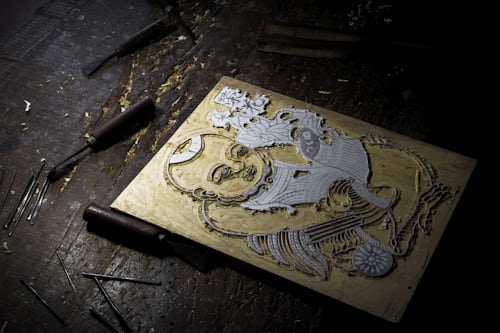
Chisels with a clear cutting edge (# 1 or # 2 for skew) are less common in woodcarving, as their straight edges appear to dig into a piece of timber. They do not have the fluidity to cut irregular shapes and curves. But straight-edged wood carving chisels are often used in relief carving to define straight lines and border work.
A chisel should be kept as though you had a knife on your side so that you cover the blade with your palm. If your template has been labeled (very much recommended), match the edge of your chisel to your marking. Raise or lower the chisel ‘s angle depending on whether you fade or drop a line.
To make a cut in your piece, tap the butt of your chisel. (You can actually hand-manipulate your chisel for really complicated detailing).
Gouges
Gouges are the real woodcarving workhorses. They are the most widely used materials, whether you are carving or carving relief. The edge of a gouge is curved (sweep # 3 to # 11).
If you manipulate your gouge by hand, then you hold it both hands. Hold it with your non-dominant hand if you tape it with a suitcase. Choose the right hold for your needs. For more detail, see How to hold a woodcarving chisel.
Put the sharp edge of your gouge where you want to start carving. Raise or lower the gouge angle according to whether the cut is short or long. If you draw your workpiece into a shape or pattern, you’ll want to aim your gouge downwards.
The force that makes the gouge cut into your workpiece can be either applied with a brushstroke or easily hand-manipulated and a long sliver or a small material can be removed depending on the angle of the blade.
Parting Tools
To build channels and angled recesses, partition tools (“V” gouges). They are also used in border and letter work.
Unlike chisels and gouges, separation devices may be hit with a briefcase or easily manipulated by hand. Hold your chisel in the right position, depending on your needs – see How to hold a wood carving chisel.
Align your guideline with the cutting-edge of your separation tool. The tip of the “V” on the edge of the gouge is to begin the cut. Push on the butt of the gouge with your dominant hand, while your non-dominant hand guides the edge. Click with a briefcase to cut your workpiece.
Learning The Basics

Old chisels would have to be reshaped with nicked or rounded ends. Use a sander to eliminate nicknames and position the chisel at an angle of 25 degrees. While using a grinder, dip the chisel into the water every two to three seconds to avoid overheating and turning blue. When that happens, the chisel won’t have a great point.
Then rub backward and forth over the finer wet/dry sandpaper, polish the chisel and press the back perfectly flat onto the paper. The paper’s good progression is 120, 220, 400, and 600 grains for all sharpening.
Set the guide to hammer the chisel at a 30-degree angle to create a “secondary bevel” and run through the grit from 220. Fix the wet/dry sandpaper gently with a 1/4-in piece of spray adhesive—smoothed edge bottle.
Roll the chisel over the sandpaper back and forth until a burr forms on the back of the blade. Return the chisel and stroke flat to remove the burr on the sandpaper. Then move to a paper with a fine scratch and repeat the process.
Final Words
There are very few essential devices for all forms of builders. For the woodworkers, the chisel is the basic device without which you can’t live. Make sure that your chisel is accurate, have a couple of sized chisels (if you only get one, make it 3/4) “and finally don’t go for the cheapest tools-do buy good chisels that have lifetime guarantees.
