Have you ever walked into a room and felt that something was missing? You know, that feeling when everything seems nice, but just one piece of furniture looks tired and out of place. For me, it was my old bench sitting in the corner of my living room. It had seen better days, and I knew it was time to give it a makeover. That’s when I decided to take matters into my own hands and learn how to upholster a bench.
The process was surprisingly easier than I expected, resulting in a beautifully transformed piece of furniture that added charm and comfort to my space.
In this blog post, I’ll share my go-to guide on upholstering a bench, from choosing the suitable fabric to attaching it to your bench. By the end of this guide, you’ll be knowledgeable and confident to tackle your bench upholstery project and breathe new life into your furniture.
Prepare the Tools and Materials
Before diving into the process of upholstering your bench, gathering all the necessary tools and materials is essential. This way, you’ll have everything you need within reach, making the process smoother and more enjoyable. There’s nothing more frustrating than having to pause your project to search for a missing tool.
👉🏻Fabric
The fabric you choose will determine the overall appearance of your upholstered bench. Ensure you have enough upholstery fabric to cover the entire bench, with some excess for stapling. For example, when I upholstered my bench, I chose a vibrant floral print that added a pop of color to my living room.
👉🏻Foam or batting
These materials provide padding for your bench, making it more comfortable to sit on. You can choose between foam for a firmer bench cushion or batting for a softer feel. I prefer using high-density foam for my bench because it provides excellent support.
👉🏻Staple gun and staples
It is the primary tool to attach the fabric to the bench frame. Invest in a good-quality staple gun, making the process much easier. When I first started, I bought a cheap staple that constantly jammed, causing me unnecessary frustration.
👉🏻Scissors
You’ll need a pair of sharp scissors to cut your fabric and padding materials to size. A good pair of fabric scissors will ensure clean, precise cuts.
👉🏻Measuring tape
Accurate measurements are crucial when upholstering a bench. A measuring tape will help you determine the correct size for your fabric and padding materials.
👉🏻Screwdriver
If your bench has existing upholstery or hardware, you’ll need a screwdriver to remove them. In my case, I had to remove a few screws to take off the old fabric from my bench.
👉🏻Pliers
Pliers are essential for removing staples or fasteners from your bench before you begin upholstering. They’ll help you avoid injuring yourself while trying to pry out stubborn staples.
👉🏻Fabric marker or chalk
To mark measurements on your fabric, use a fabric marker or chalk to easily remove or wash off once you’ve finished upholstering.
👉🏻Straight pins
These pins come in handy when securing the fabric in place before stapling. They help ensure the fabric remains taut and wrinkle-free as you work.
👉🏻Adhesive spray (optional)
While not necessary, adhesive spray can secure the padding to the bench before attaching the fabric. I found it helpful to keep the foam in place while I worked on stapling the fabric.
Choosing the Right Fabric

Selecting the perfect fabric for your bench upholstery project can be exciting and daunting. With countless options available, it’s essential to consider factors such as durability, style, and maintenance to ensure a successful outcome.
💺Durability
When I first started my bench upholstery project, I quickly realized that not all fabrics are created equal in terms of durability. Choosing a bench upholstery fabric that can withstand daily wear and tear is crucial, especially if you place your bench in a high-traffic area or are used frequently.
Heavier fabrics, such as canvas or upholstery-grade materials, are ideal. I chose a heavy-duty cotton blend fabric for my bench that has held up well against constant use and even the occasional spill.
💺Style
The fabric you select should also complement the overall design of your room and reflect your style. Take some time to browse different fabrics, patterns, and colors before deciding. You may choose a bold print that makes a statement or a subtle, neutral tone that blends seamlessly with your existing décor.
For instance, my living room has a modern, minimalist theme, so I opted for a vibrant floral print that added a touch of personality without overwhelming the space. Don’t be afraid to experiment with different styles. Remember, this is your chance to create a unique piece of furniture that reflects your taste and creativity.
💺Maintenance
Its maintenance requirements are another essential factor you should consider when choosing the right fabric. Some fabrics may require more care than others, so ensuring you’re comfortable with the cleaning and upkeep involved is essential.
For example, delicate fabrics like silk or velvet may need special care, such as professional cleaning or spot treatment. In contrast, you can typically clean more durable materials like canvas or microfiber with a damp cloth or vacuum them as needed.
When I chose the fabric for my bench, I selected a material that was both stain-resistant and easy to clean, as I knew it would be exposed to occasional spills and everyday dust. It will keep your upholstered bench a breeze and continues to look fresh and vibrant despite regular use.
Step-by-Step Guide on How to Upholster A Bench
Now that you’ve prepared your tools and materials and chosen the perfect fabric, it’s time to dive into upholstering your bench.
✔Step 1: Remove Existing Upholstery
If your bench already has upholstery, the first step is to carefully remove it. It will give you a clean slate and ensure your new fabric fits snugly and securely. In my case, my bench had a faded, outdated fabric that needed to go.
Start using a screwdriver to remove any screws or hardware holding the existing upholstery. Set these items aside in a safe spot, as you may need them when reassembling your bench.
Next, use pliers to remove staples or fasteners securing the fabric to the bench frame. Take your time and be gentle to avoid damaging the frame or injuring yourself. I found that using needle-nose pliers was particularly helpful for removing stubborn staples.
Once you remove all the fasteners, carefully lift the old fabric off the bench, noting how it was attached. It can serve as a helpful reference when attaching your new fabric.
✔Step 2: Measure and Cut the Fabric
Accurate measurements are crucial to ensure your new fabric fits your bench perfectly. Start by measuring the dimensions of your bench, including the length, width, and depth. Add a few extra inches on all sides to allow for stapling and to account for any errors. For example, I added 3 inches on each side for a secure fit when I measured my bench.
With your measurements in hand, use a fabric marker or chalk to mark the dimensions on the backside of your chosen fabric. For accurate markings, you lay the fabric on a flat, clean surface. Double-check your measurements before cutting to avoid any mistakes.
Using a pair of sharp fabric scissors, carefully cut along the marked lines, ensuring clean and straight edges. It’s a good idea to cut slightly outside the lines to account for any fraying or adjustments that may be needed later. Using a ruler or straight edge as a guide helped me achieve precise cuts.
Once you’ve cut your fabric to size, take a moment to inspect it for any imperfections or inconsistencies. Trim any uneven edges to ensure a neat and professional-looking finish when upholstering your bench.
✔Step 3: Add Padding
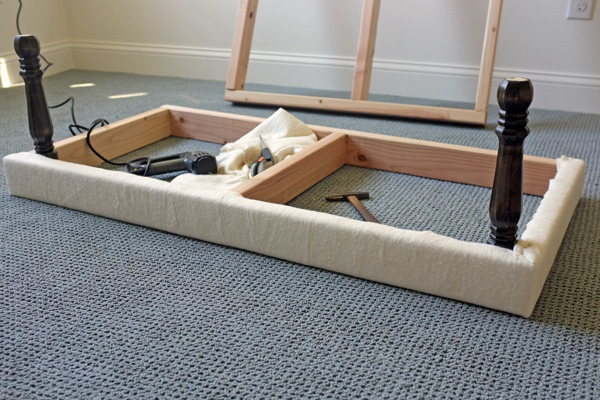
Adding padding to your bench enhances its comfort and gives it a polished, professional appearance. You can use foam or batting as your padding material, depending on your preference. As mentioned earlier, I chose high-density foam for my bench to provide excellent support and durability.
To begin, measure the dimensions of your bench seat and cut your chosen padding material to size. If you’re using foam, you’ll want it slightly larger than the bench seat to account for compression when sitting. In my case, I added an extra half-inch to the length and width of my foam.
Next, lay the foam or batting on the bench, ensuring it’s centered and aligned with the edges. If you’re using adhesive spray, apply it to the bench seat before placing the padding. It will help secure the padding in place while you attach the fabric. This step prevented my foam from shifting during the upholstery process.
Once your padding is securely in place, it’s time to attach the fabric.
✔Step 4: Attach the Fabric
With your padding in place, it’s time to attach your fabric to the bench. This step requires patience and precision to ensure a smooth, wrinkle-free finish.
Drape the fabric over the bench and padding, ensuring it’s centered and aligned with the edges. Use straight pins to temporarily secure the fabric, starting at the center of each side and working your way outwards. It will help keep the fabric taut as you staple it to the bench frame.
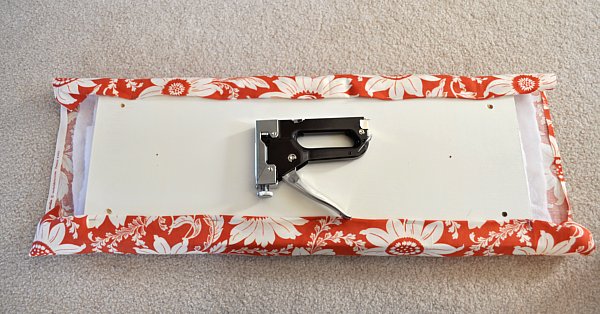
Next, grab your staple gun and attach the fabric to the bench frame. Begin at the center of one side, pulling the fabric tight and stapling it to the underside of the frame. Continue working outward, adding staples every couple of inches and ensuring the fabric remains taut.
Once you’ve completed one side, move on to the opposite side, pulling the fabric across the bench and repeating the same stapling process. Then, proceed to the remaining two sides, maintaining tension in the fabric as you staple.
When it comes to corners, neatly fold and staple the fabric, ensuring a clean, professional finish. I found that folding the fabric, like wrapping a gift, created the best-looking corners for my bench.
Double-check your work after all four sides are securely attached, ensuring the fabric is smooth and wrinkle-free. Trim any excess fabric from the underside of the bench, and reattach any screws or hardware you removed earlier.
✔Step 5: Finishing Touches
Congratulations! You’ve successfully upholstered your bench, and now it’s time to add the finishing touches that will elevate your project to the next level. These final details not only enhance the overall appearance of your bench but also ensure its durability and longevity.
Trimming and securing loose edges
Inspect your bench for any loose fabric edges or areas where the fabric may not be as taut as desired. Use additional staples, if necessary, to secure these areas and ensure a smooth, professional finish. Be sure to trim any excess fabric from the underside of the bench to maintain a clean appearance.
Adding decorative elements
Consider adding decorative elements such as piping, nailhead trim, or tufting to give your bench a polished, custom look. For my bench, I added nailhead trim along the edge of the seat to create a sophisticated, elegant look. To do this, I measured and marked where each nailhead would go, ensuring even spacing, and then gently hammered them into place.
Protective finish (optional)
Depending on the fabric you’ve chosen and the intended use of your bench, you may want to apply a protective finish, such as Scotchgard, to help guard against stains and spills. It can help prolong the life of your fabric and keep your bench looking fresh and vibrant.
Reassembling your bench (if necessary)
If you had to disassemble your bench for the upholstery process, now is the time to reassemble it, ensuring all screws and hardware are securely in place.
Final inspection
Take a step back and admire your handiwork! Carefully inspect your bench to ensure everything is in order and looks as you envisioned. Don’t be afraid to make minor adjustments or touch-ups as needed. It is your custom creation.
Frequently Asked Questions
Q: Can I upholster a bench without sewing?
A: Maybe you have a bench that you want to give a new lease of life, but the thought of sewing an upholster seems daunting. You’ll be pleased to hear that you don’t have to be a master seamstress to reupholster a bench.
There are various methods you can use that don’t require any sewing at all. From using a staple to fabric glue, it’s easy to transform your bench into a statement piece. Don’t let a lack of sewing skills hold you back from creating a beautiful new space in your home.
Q: How much fabric do I need to upholster a bench?
A: The amount of fabric you require will depend on a few different factors, including the dimensions of your bench and the depth of the cushion you plan to create. But don’t get too caught up in the details.
With a little measuring and careful planning, you’ll be well on your way to covering that bench in no time. Just remember to give yourself some extra fabric in case of mishaps or missteps. After all, having a bit of a safety net never hurts!
Q: How do I choose the right foam or batting for my bench?
A: First, think about how you plan to use the bench. Will it be used mostly for sitting or for sleeping? It will determine how firm or soft you want your foam or batting. Next, consider the style of your bench and the look you’re going for. Do you want sleek and modern or cozy and comfortable? It can help determine the thickness and density of your chosen material. Lastly, don’t be afraid to ask for help from a professional or do some research online.
Q: Can I reupholster a bench with leather?
A: Have you ever looked at a piece of furniture and thought, “I could make this look so much better?” Well, I had that exact thought when I inherited my grandmother’s old wooden bench. The fabric on the cushion had seen better days, but I didn’t want to replace it with just any fabric. So, I decided to take on the challenge of reupholstering it with leather.
With a little research and patience, I transformed the worn-out bench into a beautifully crafted piece of furniture I proudly display in my home. So, can you reupholster a bench with leather? Absolutely, and I highly recommend giving it a try!
Q: How often should I reupholster my bench?
A: When reupholstering your bench, the key factor to consider is the usage it receives. If your bench is in a high-traffic area or frequently used, then it might be time to refresh the upholstery after a few years. However, the upholstery may last longer than expected if your bench is in an infrequently used room. It also depends on the quality of the fabric and the foam padding.
So, if you’re unsure about the condition of your bench’s upholstery, it’s always a good idea to inspect it or consult with a professional. Ultimately, the frequency of reupholstering your bench is up to you and your needs, but ensuring that it remains comfortable and visually appealing is crucial.
Final Thoughts
Learning how to upholster a bench is a rewarding and practical skill that can breathe new life into your furniture while adding a touch of personal style. With some basic tools and materials, you can easily transform a tired-looking bench into a beautiful, comfortable piece that reflects your taste and complements your home decor. Moreover, the process of upholstering a bench without sewing is simple and allows for flexibility in updating the fabric whenever your design preferences evolve.
As you embark on this creative journey, remember that practice makes perfect, and don’t be afraid to experiment with different fabrics and patterns. The satisfaction of seeing your once-worn bench become attractive and cozy seating is truly unparalleled.
Plus, the skills you develop in this project can be applied to other pieces of furniture, allowing you to create a cohesive and customized look throughout your living space. So go ahead, roll up your sleeves, and enjoy the process of transforming your bench into a reflection of your unique personality and style.

