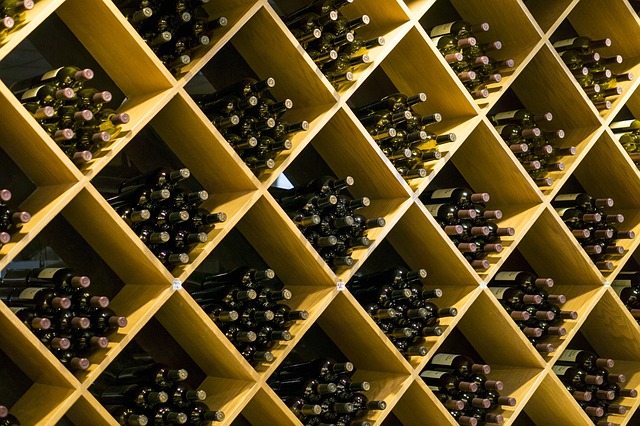
Are you a wine lover out there, but having an issue where to put your vast collection of wines? Well, there are a variety of wine racks available but in case you are looking for a budget-friendly one, you can build a wine rack of your own. Below is a process on how to build a diamond wine rack which can give you a one-of-a-kind furniture piece.
Different Types of Wine Racks
It is actually a nighttime activity of most Americans to indulge over some glasses of wine. However, only a few individuals can afford to have fancy wine storage and wine cellars are not usually present in many homes. Additionally, commercially available shelves are costly and may not actually fit into your home’s dimensions.
Moreover, the wine refrigerators in the market usually have space limitations which hinder wine lovers from enjoying their vast collection of wine. There are actually people forcing themselves to come up with improper wine rack methods. But, being aware of the different types of wine racks, in which some can be done all by yourself, is a great help. Below are some examples of the different wine racks available in the market:
Wall Mounted Metal Wine Rack
Generally, this wine rack can handle around 18 wine bottles. In each row, the Wall Mounted Metal Wine Rack basically accommodates 2 bottles in a row. It measures around 36 inches tall, 12 inches for its thickness and 8.5 inches in terms of its depth. The rugged steel is the common material of the Wall Mounted Metal Wine Rack.
This wine rack typically hangs on the walls which can display the vast wine collections really comfortably. You can actually use and hang one rack if the space is just small. Moreover, several racks can be used for stacking in case you have a spacious area. This wine rack is highly applicable for both small wine cellar options and wine lovers having large collections of wine.

ADVANTAGES:
- Guests can view the wine bottles
- Has the option for additional stacking of more rows
DISADVANTAGES
- There are walls that cannot be mounted
- Demands for assembling process
- Costly
Thermoelectric Wine Cooler
The wine cooler is actually a wine refrigerator that is perfect for home use. It is professionally graded which completely seals the wine bottles. This usually results in maintaining the freshness of the wine at its intended temperature.
The thermoelectric wine cooler can basically cradle a maximum of 12 wine bottles. It has an LED light which results in a more sophisticated and elegant appearance. Moreover, its materials come with glass and external stainless steel. The wine cooler silently cools down every wine bottle.
ADVANTAGES:
- It has an environment in which the temperature is being controlled.
- Sleek appearance
- Very efficient for energy and space
DISADVANTAGES:
- Costly
- Can only accommodate 12 wine bottles
- May not be suitable in some kitchen areas
Countertop Wine Rack
The countertop wine rack comes in a decorative style that can appropriately suit every countertop type. It can actually accommodate at least 6 wine bottles. The sleek and sophisticated style combines well with many kitchen styles. Aside from that, you can the countertop wine rack in a fully assembled form.
Basically, this wine rack can save up more spaces which allow you to display a minimum of 6 wine bottles. This is generally in conjunction with catering the extra space for other necessary items over the countertop. The measurement comes with 11 inches in both length and height and 8 inches for the width.

This wine rack is generally good as it guarantees the horizontal storage of the wine bottles. However, the rack location must also be determined. The best location is a place that is out of the sun and has controlled temperature.
ADVANTAGES:
- Storage inside the house is very easy
- Already assembled
- The appearance combines well with other decors
DISADVANTAGES:
- Can only cradle a minimum of 6 wine bottles
Diamond Wine Rack
The diamond wine rack usually offers a style that has a very well designed appearance. It is actually customizable which perfectly matches among various spaces. The design of this wine rack is basically a cube with shelves that come in diamond-shape.
Actually, when you opt to look for ways on how to build a diamond wine rack, you can make it based on your own standards. In addition to that, you can pick its colour that blends well with your present rooms or other furniture.
This wine rack will generally demand some manual labor in its production, yet there are only few materials needed and has very simple instructions. Moreover, the way on how to build a diamond wine rack only takes less than an hour and demands a lesser cost compared to other wine racks available in the market.
ADVANTAGES:
- Budget-friendly
- Can be customized based on your preferred color and space
DISADVANTAGES:
- Demands for manual labor
How to Build a Diamond Wine Rack?

Generally, the steps on how to build a diamond wine rack need to have a diamond-shaped bin frame with horizontal shelves. These serve as boxes in holding and storing wine bottles. A good feature of this DIY diamond wine rack is that it can also handle home canning jars. Below are the materials, steps, and other important information that you need to know in making the process on how to build a diamond wine rack:
PARTS OF THE DIAMOND WINE RACK:
DIAMOND BIN
This part usually holds one case of wine bottles either the size of a Bordeaux or Burgundy. It actually has an internal dimension of 14 inches on each side. Moreover, larger wine bottles like Sparkling wine and magnums will less fit in a diamond-shaped case.
FRAME
The frame is another part that should be considered on how to build a diamond wine rack. It generally has a measurement of 9 feet in height and 18 feet in width. With this, it can hold around 600 wine bottles in one diamond bin. This is actually equivalent to 50 cases of wines.
EDGE SLOTS
Usually, these portions are just included in the diamonds. The function of these slots is to hold very well bottles of sparkling wines which is equivalent to a 100-case cellar.
FRAME OF DIAMOND BIN
This frame has a standard measurement of 9 feet in height and 10 feet in width. A full quarter of the wine cellar or around 25 cases of wine bottles are ready to be accommodated by this frame.
MATERIALS FOR BUILDING DIAMOND WINE RACK
Below are the materials that you need in order to make a diamond wine rack:
-Bricks
-finishing strips of oak, walnut, or redwood of about ¼” – 1 piece
- For top, bottom, and sides part:
-either ¾ interior plywood or 1×12 stock
- For bin frame
-nails of 8d type
- For bin boards and diagonals
-finishing nails of about ½” – 1 piece
-1×12 stock
- Optional materials
-masonry bolts
-wire of 13-gauge size or nylon cord
-countersunk screws with a size of ⅝” – 1 piece
-wood stain
-plywood of about ½” for wine rack backing
-trim with a measurement of ¾”; in case plywood is used
TOOLS FOR BUILDING DIAMOND WINE RACK
-Hammer
-Framing or combination square
PROCEDURE ON HOW TO BUILD A DIAMOND WINE RACK
1. Cutting off the top, bottom, and side portion
From either the 1×12 stock or ¾ inch interior plywood, cut out the portions for the top, bottom, and both sides of the frame. Keep in mind that the top and bottom areas of the frame both have measurements of 10 feet in length. Meanwhile, the two sides of the frame measure 9 feet in length. Afterwards, put nails on the base part of the two sides of the frame.
2. Setting up of the frame
Basically, you must have found a permanent location for your diamond wine rack. Once you already locate it, it’s time to set the frame. In order to prevent the sides from falling in any direction, prop the frame with boxes or incorporate other ways in preventing it to happen.
Probable suggestions are slipping some bricks beneath the base of the board. Or, you could set the top board across the top portion in order to provide stability on the frame. However, do not nail it yet.
3. Cut and nail the diagonals and the bin boards
Initially, toe-nail the first bin board on the frame at the lower left portion. It should have a 45-degree angle on its edge to fit into the corner. Just remember to make the other side a little bit longer by having a measurement of around 14 inches.
On the other hand, the shorter side must have a measurement of about ¾ inches in length with around 28 pieces. Keep in mind that the edge of this side touches the side of the frame which has a measurement of 19.8 inches over the top of the board base.
Moreover, the other side of the diagonal must be able to touch the base of the board with an exact measurement of 19.8 inches from the sideboard. Put the diagonal in its place and do the back-nailing over the bin board.
Then, toe-nail the next diagonal into the first diagonal with a measurement of 7 inches on every side. Just ensure to have an internal spacing of about 14 inches between them. Subsequently, cut the next one and put it in place. Perform a back-nailing on the second diagonal into the second level of the bin boards.
Repeat the process until the top of the frame is already finished. Once you’re already on the top portion, do a mock-up over the construction and put some top boards over them. Cut out any bin boards that are long enough and the last piece of the diagonal.
Next, nail the top portion of the board into the bin boards and into the diagonals over the top rows of the bins. This will result in various spaces which are equal to 25 cases of wine bottles placed inside the bins. From here, you are able to see the top portion of the capsules.
The finishing touches
For the finishing touch on how to build a diamond wine rack, it is ideal to dress up the bins using some finishing strips from walnut, oak, or redwood. Tack them on the bins and on every shelving through the finishing nails. In case the finishing stock has a lighter color from what you prefer, basically cut it on a length that you desire.
Generally, give it some touches of the wood stain of your desired shade. Dry it up and nail it afterwards. There are actually different patterns that you can use for this wine rack. But vertical strips or diagonal patterns may suit perfectly. Moreover, a horizontal pattern on the bin boards may make the appearance neat looking.
How to create the perfect angles?
In doing the steps on how to build a diamond wine rack, you must remember that the right angles appear in an area where the bin board and the first diagonal meets. Since you have 14 inches for the internal dimension which comes from the triangle sides traversing the bin board and diagonal, you will have 19.8 inches hypotenuse. Due to this, the first bin on the bottom and sideboards has a measurement of 19.8 inches.
Wine Rack Building Tip:
The diamond wine rack has the possibility to fall over the face once it is already full of wine especially when its location has an uneven floor. One best solution for this is to prop up the base of the board which will make the frame to lean back. You can also try to place two pieces of masonry bolts to either the base of the wine rack or through the wall.
Final Thoughts
How to build a diamond wine rack is a budget-friendly way of storing your wine cellars. It will also provide a very basic design which will hold around 600 wine bottles based on your preference. Moreover, making a wine rack on your own gives you the freedom to choose your preferred style and color. Just be careful with the measurements of each bin and diagonals so that you can successfully come up with a neatly looking wine rack.


