As parents, we know how quickly our little ones grow up. It seems like just yesterday when we were putting together the baby crib and decorating the nursery for our precious bundle of joy. But in the blink of an eye, they’re no longer babies, and that once-essential piece of furniture is left unused, collecting dust in a corner or taking up valuable storage space. In this article, we’ll explore the world of crib-to-bench transformations and guide you on how to use crib furniture to make a bench.
The idea of creating a repurposed crib may seem daunting initially, but rest assured that this project is eco-friendly and budget-friendly, allowing you to breathe new life into a piece of furniture with sentimental value. Just imagine the countless memories you will create on this bench, from family gatherings to quiet moments spent with a good book. The best part? This transformation doesn’t require advanced woodworking skills, so you can complete this project even if you’re a DIY novice.
So, let’s get started on this heartwarming project that pays homage to the memories of your child’s early years and creates a space where you can make new memories.
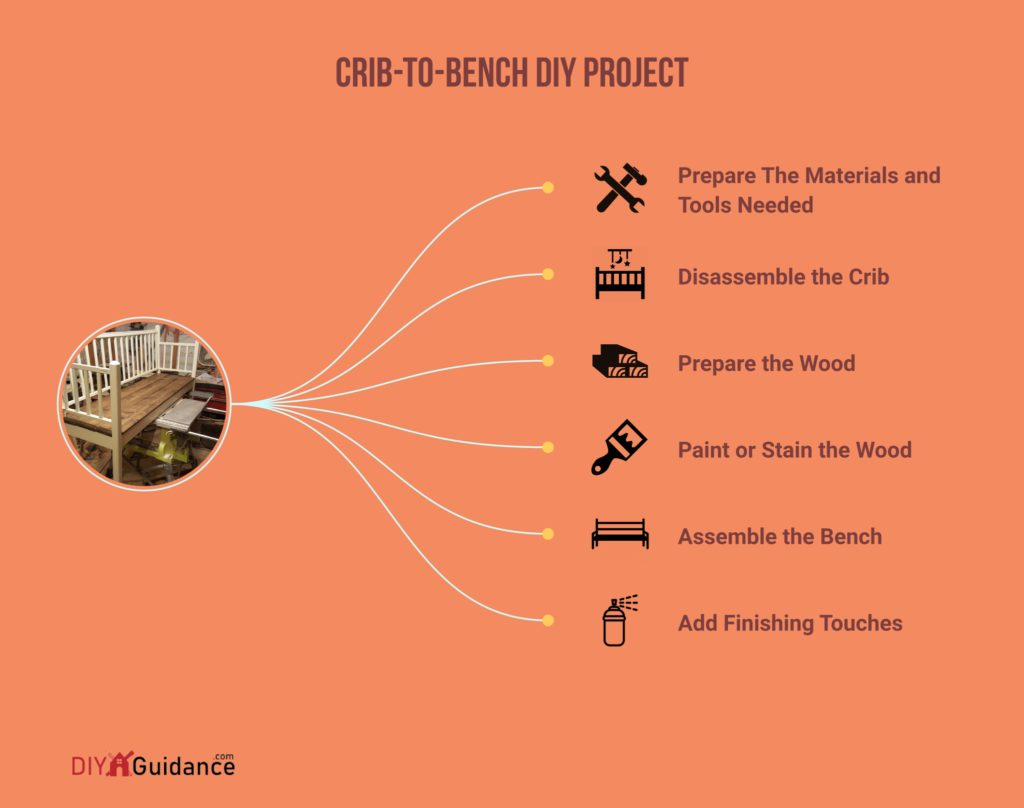
Prepare The Materials and Tools Needed
Before diving into the crib-to-bench transformation process, gathering all the necessary materials and tools is crucial. Preparing everything beforehand will ensure a smoother project and help you stay organized and focused throughout the transformation.
▶Crib Furniture (with Removable Sides)
The primary material for this project is, of course, the baby crib. Ensure your crib has removable sides, which must be detached to create the bench structure. Ideally, choose a crib with a sturdy headboard and footboard to support the bench’s weight and users.
▶Wood Planks or Plywood (for the Seat)
To create your bench seat, you’ll need wood planks or plywood. The choice between the two depends on your preference and budget.
For example, wood planks may provide a more rustic look, while plywood offers a smoother surface. Make sure the wood you choose is strong enough to support the weight of the people who will use the crib bench.
▶Sandpaper (Medium and Fine Grit)
Sandpaper is essential for preparing wood surfaces before painting or staining. Medium-grit sandpaper helps remove rough spots or old paint, while fine-grit sandpaper ensures a smooth finish. Having both types on hand will ensure your bench has a polished and professional appearance.
▶Paint or Wood Stain
Choose a paint or wood stain color that complements your home’s décor. Paint offers more color options and can provide a modern look, while wood stain enhances the wood’s natural grain and adds warmth to the bench. Consider using a semi-gloss or gloss finish for added durability.
▶Paintbrush or Roller
A paintbrush or roller is necessary for applying paint or wood stain to the wood surfaces. A paintbrush provides more control and precision for detailed work, while a roller allows for faster and more even coverage on larger surfaces.
▶Wood Screws
You’ll need wood screws to secure the seat pieces to the headboard and footboard of the crib. Choose screws long enough to penetrate the seat material and the crib structure for a solid connection.
▶Screwdriver or Power Drill
A screwdriver or power drill is required to remove the crib sides and attach the bench. A power drill can speed up the process and reduce hand fatigue, while a screwdriver may be more accessible for those who don’t own a power drill.
▶Measuring Tape
A measuring tape is essential for determining the length of your bench and ensuring you cut the wood planks or plywood to the correct size. Accurate measurements will result in a well-fitted and professional-looking bench.
▶Saw (if Necessary, to Cut Wood Planks or Plywood)
Depending on the size of the wood planks or plywood you purchase, you may need a saw to cut to the appropriate length for your bench. A handsaw or power saw can be used depending on your comfort level and experience with woodworking tools.
▶Protective Gear (Gloves, Goggles, and Mask)
Safety should always be a priority when working on DIY projects. Protective gear, such as gloves, goggles, and a mask, should be worn to prevent injuries and protect yourself from dust and debris during the transformation process.
Step 1: Disassemble the Crib
The first step in your crib-to-bench transformation is disassembling the crib. By breaking down the crib into its primary components, you can work with the individual pieces more easily, ensuring a successful transition from crib to bench.
Remove the Sides of the Crib
To begin, carefully inspect your crib to determine how the sides are attached to the headboard and footboard. In most cases, you may need to connect them using screws or bolts. Using a screwdriver or power drill, gently remove these fasteners, not damaging the crib’s structure.
As you detach the sides, pay close attention to any additional support structures, such as metal brackets or wooden slats, that you may also need to remove. Ensure that you’re left with only the headboard and footboard, which will serve as the main framework for your bench.
Keep the Hardware for Future Use
During the disassembly process, you’ll likely come across various pieces of hardware, such as screws, bolts, and brackets. It’s essential to keep these items organized and safely stored, as they may be useful during the assembly of your bench.
Consider placing the hardware in a small container or plastic bag and labeling it clearly to avoid confusion later. It will simplify the assembly process and help avoid unnecessary trips to the hardware store for replacement parts.
Step 2: Prepare the Wood
Now that you disassembled your crib, it’s time to focus on the heart of your bench transformation, preparing the wood for the seat. This step is crucial in ensuring a comfortable and visually appealing seating area that you and your loved ones will enjoy.
Measure and Cut the Wood for the Seat
As you craft the perfect seat for your bench, it’s essential to start with accurate measurements. Use a measuring tape to determine the distance between the headboard and footboard of your crib, taking note of this length for reference. This measurement will dictate the size of your bench and ensure a snug fit between the crib’s existing structure.
With your measurements, it’s time to cut the wood planks or plywood to create the seat. If you’re using wood planks, ensure they are wide enough to provide ample seating when placed side by side.
Alternatively, if you opt for plywood, ensure it’s cut to the proper dimensions to fit securely between the headboard and footboard.
When cutting the wood, always prioritize safety and accuracy. Use a handsaw or power saw, depending on your comfort level and experience, and don’t forget to wear protective gear like gloves and goggles.
Sand the Wood Pieces for a Smooth Finish
After cutting the wood to the appropriate size, it’s time to focus on achieving a smooth and polished finish. It enhances the overall appearance of your bench and ensures a comfortable seating experience free of splinters or rough edges.
Start by sanding the wood pieces using medium-grit sandpaper, including the headboard and footboard. It will help remove rough spots, old paint, or uneven surfaces.
Once you’ve addressed any significant imperfections, switch to fine-grit sandpaper for a final pass. It will provide a smooth and even finish, preparing the wood for painting or staining.
As you sand the wood, take your time and pay attention to detail. Remember that the effort you put into this step will reflect your bench’s final look and feel. Investing time and care into preparing the wood sets the stage for a stunning and comfortable bench that showcases your dedication and creativity.
Step 3: Paint or Stain the Wood
With your bench’s wood components prepped and ready, it’s time to add color and personality to your creation. This step allows you to customize your bench according to your taste and home décor, making it a unique and cherished addition to your living space.
Choose a Paint or Stain Color
Selecting the right paint or stain color is an opportunity to infuse your style into your bench. Consider your home’s existing colors, design elements, and the overall look you want to achieve with your bench.
Pain might be the best choice for a modern and colorful touch. Paint comes in various colors and finishes, allowing you to create a bold statement piece or a subtle accent for your room.
On the other hand, the wood stain might be ideal for a more natural and warm aesthetic. Wood stain enhances the wood’s natural grain and can add depth and richness to your bench. Stains are available in various shades, from light and airy to deep and rich, providing flexibility in achieving your desired look.
Whether you paint or stain, it’s always a good idea to test a small, inconspicuous area of the wood before committing to ensure you’re happy with the color and finish.
Apply the Paint or Stain to All Wood Surfaces
Once you’ve chosen your paint or stain color, it’s time to apply it to the wood surfaces. It includes the headboard, footboard, and seat pieces. Before beginning, ensure your work area is well-ventilated and protected with drop cloths or newspapers to avoid spills and stains.
Apply an even paint or stain to all wood surfaces using a paintbrush or roller. A paintbrush provides more control for detailed areas, while a roller allows faster coverage on larger surfaces. Be mindful of drips and uneven application, smoothing them out as you go for a professional finish.
Allow the paint or stain to dry according to the manufacturer’s instructions. Depending on the product, you may need multiple coats to achieve your desired color and finish. Always allow each coat to dry thoroughly before applying the next one.
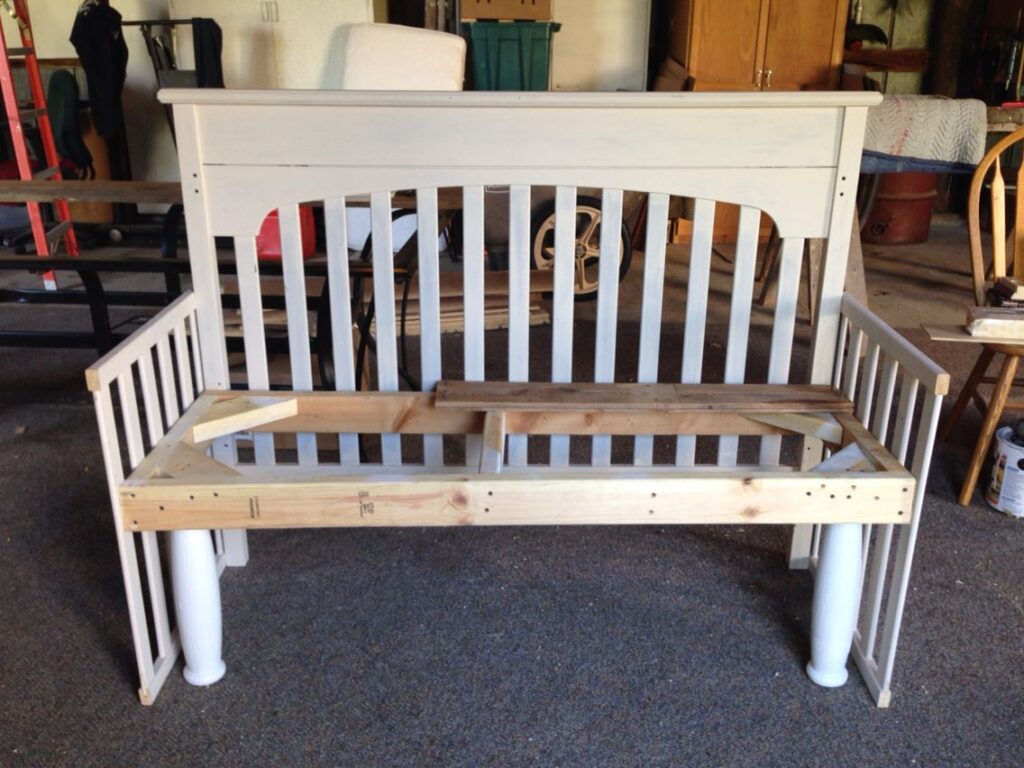
Step 4: Assemble the Bench
The moment you’ve been working toward has finally arrived: assembling your bench. This step marks the culmination of your creativity, hard work, and dedication to repurposing your cherished crib furniture.
Position the Headboard and Footboard
Begin by finding the perfect spot for your bench in your home, whether in your entryway, living room, or even on your porch. Ensure the area is level and provides enough space for the bench’s dimensions.
Next, position the headboard and footboard upright, approximately the same distance apart as the length of your seat pieces. You may want to enlist the help of a friend or family member to hold the headboard and footboard steady during this process.
Attach the Seat Pieces to the Headboard and Footboard
With the headboard and footboard in place, it’s time to secure the seat pieces. If you’re using wood planks, arrange them side by side, ensuring they’re evenly spaced and flush with the headboard’s and footboard’s edges. If you’ve opted for plywood, align it carefully with the headboard and footboard so it sits level and snugly between them.
Attach the seat pieces to the headboard and footboard using the wood screws and a screwdriver or power drill. Be sure to use screws that are long enough to penetrate both the seat material and the crib structure, creating a sturdy and secure connection. Double-check that the seat is level and properly aligned before tightening the screws completely.
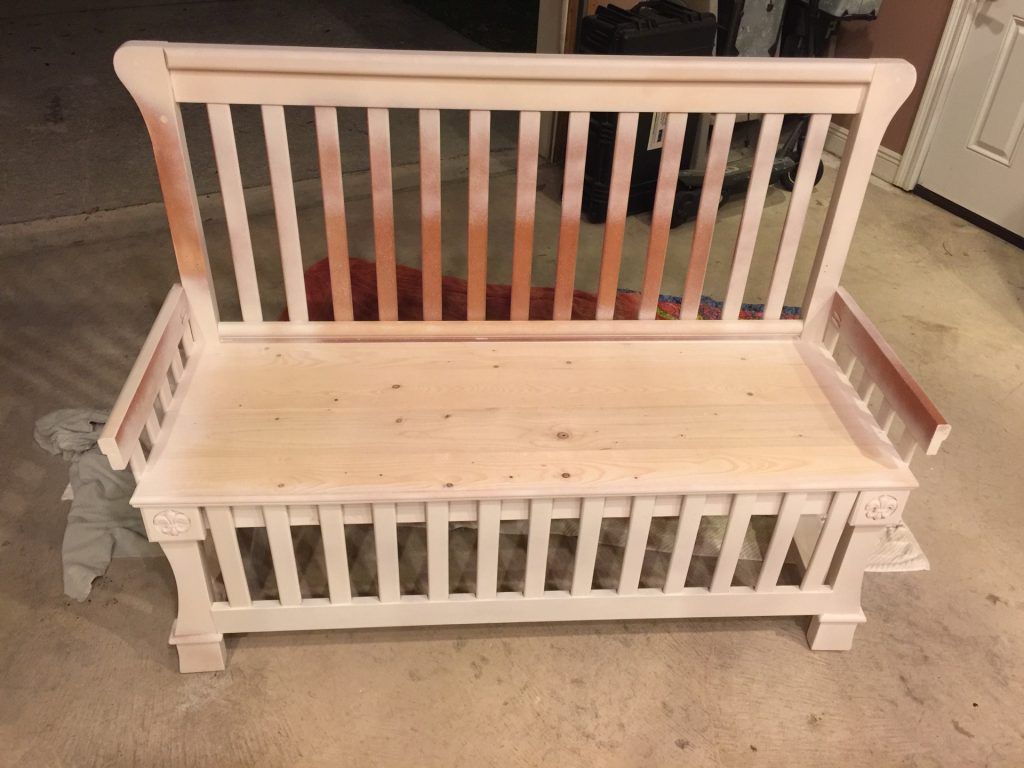
As you complete the assembly process, take a moment to appreciate the transformation you’ve achieved. Your once-unused crib is now a beautiful and functional bench, infused with memories of your child’s early years and ready to provide a comfortable and stylish seating area for your family and friends.
Step 5: Add Finishing Touches
With your bench assembled and in place, it’s time to focus on the finishing touches that will make it your own. This step allows you to add elements of comfort and style and practical storage solutions to enhance your bench’s functionality and visual appeal.
Add Cushions or Throw Pillows for Comfort and Style
To elevate the comfort and aesthetic of your bench, consider adding cushions or throw pillows to the seat. These cozy accents provide a more comfortable seating experience and allow you to incorporate colors, patterns, and textures that complement your home décor.
Remember the overall look and feel you want when selecting cushions or throw pillows. Choose colors and patterns that coordinate with your bench’s paint or stain color and the surrounding décor for a cohesive and polished appearance.
Alternatively, if you prefer a more eclectic and playful vibe, mix and match various colors, patterns, and textures to create a unique and eye-catching arrangement.
Consider Adding Storage Baskets Underneath the Seat
To elevate the comfort and aesthetic of your bench, consider adding cushions or throw pillows to the seat. These cozy accents provide a more comfortable seating experience and allow you to incorporate colors, patterns, and textures that complement your home décor.
Remember the overall look and feel you want when selecting cushions or throw pillows. Choose colors and patterns that coordinate with your bench’s paint or stain color and the surrounding décor for a cohesive and polished appearance.
Alternatively, if you prefer a more eclectic and playful vibe, mix and match various colors, patterns, and textures to create a unique and eye-catching arrangement.
Frequently Asked Questions
Q: Can I use any crib for this project?
A: You can transform most baby cribs with removable sides into a bench. However, ensuring the crib’s headboard and footboard are sturdy enough to support the bench’s weight and users is essential.
Whether you’re working with an old crib passed down from a family member or shopping for a new one specifically for this project, there are a few key things to remember. Considering factors like the size and shape of the crib and its materials, you can get the perfect crib for your bench transformation project.
Q: What type of wood should I use for the seat?
A: Consider a few things when choosing the right wood for your bench. You’ll want to ensure that the wood is strong enough to support the weight of the bench users. Plywood is a popular choice as it is sturdy and affordable, while wood planks can offer more character and style.
If you opt for solid wood planks, you may want to consider the type of wood you use. Pine, cedar, and oak are popular as they are durable and readily available. However, consider teak or mahogany for a more unique and exotic option.
Q: Can I repurpose crib with a drop-side for this project?
A: As a parent, you know how important it is to make the most out of baby furniture once your little one has outgrown it. So, it’s no wonder many of us have jumped on the crib-to-bench DIY craze.
But before diving in headfirst, you may wonder if using a drop-side crib is safe. It’s best to avoid using cribs with drop-sides, as they may not be structurally sound enough to support the weight of a bench. Instead, choose a crib with fixed sides that you can easily remove.
Q: How do I maintain my new bench?
A: Taking care of your new bench ensures it looks great and lasts for years. To start, dust the wood surfaces regularly with a soft cloth or duster to remove any dirt or debris that may have accumulated over time. You can also use mild soap and warm water to remove stubborn stains or spots.
If you’ve painted or stained the wood, you may want to consider using a sealant to protect it from scratches, fading, and everyday wear and tear. Re-seal the wood every few years to ensure your bench looks pristine for more years.
Final Thoughts
Repurposing crib furniture to create a beautiful and functional bench is a testament to your creativity and resourcefulness. Following the steps outlined in this guide, you’ve given new life to a cherished piece of furniture and created a unique and meaningful addition to your home.
This crib-to-bench transformation symbolizes the growth and changes that families experience, honoring your child’s early years and providing a comfortable space for new memories to unfold. Your personalized and stylish bench serves as a reminder of the love and cares woven into every step of this project.
Now that you’ve completed this transformation, we encourage you to share your experience with friends and family. Inspire others to think outside the box and explore the possibilities of repurposing furniture to create one-of-a-kind pieces that tell a story of love, growth, and creativity. Let your bench be an example of the beauty that can emerge when we embrace change and look for opportunities to create something new and meaningful from the cherished pieces of our past.
Remember, your imagination and resourcefulness are powerful tools that bring new purpose and beauty to the world around you. So, take pride in your creation, and inspire others to embark on their transformation journey.
