As a homeowner, I know firsthand how the smallest details can make the biggest difference in transforming a space. One such detail that has always caught my eye is crown molding. This decorative trim’s elegant lines and intricate designs can instantly elevate any room, especially when added to kitchen cabinets. Do you know how to install crown molding on cabinets?
I remember the first time I installed crown molding on my cabinets. The sense of accomplishment and pride I felt as I stood back and admired the stunning transformation was unparalleled.
In this blog post, I want to share my experience and guide you through installing crown molding on your cabinets so you can enjoy the beauty and sophistication it brings to your home. Let’s embark on this exciting DIY project together and create a kitchen that will be the envy of your friends and family.
What is Crown Molding?
Before we begin our journey of installing crown molding on your cabinets, let’s take a moment to understand what it is and how it can enhance the beauty of your home.
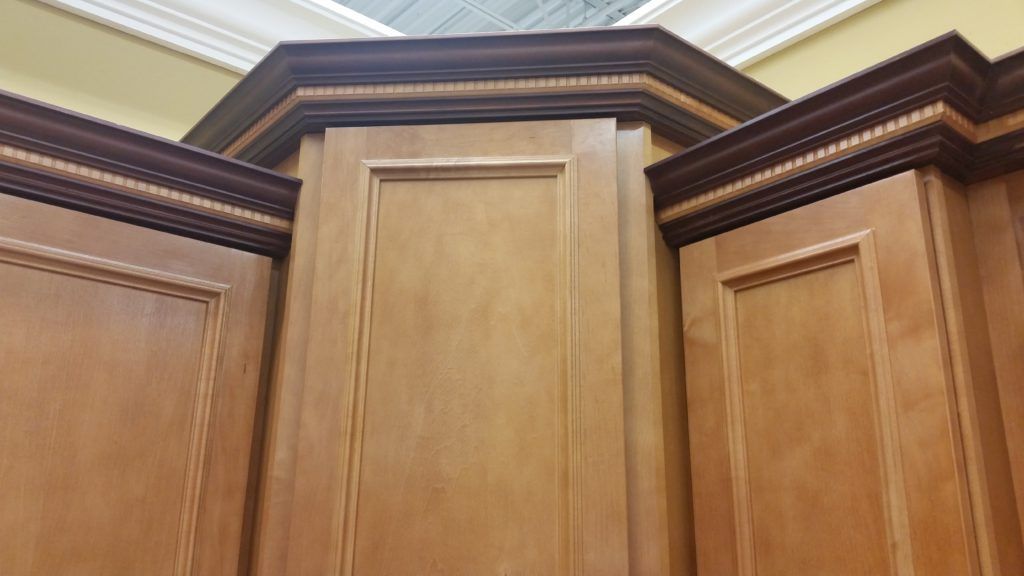
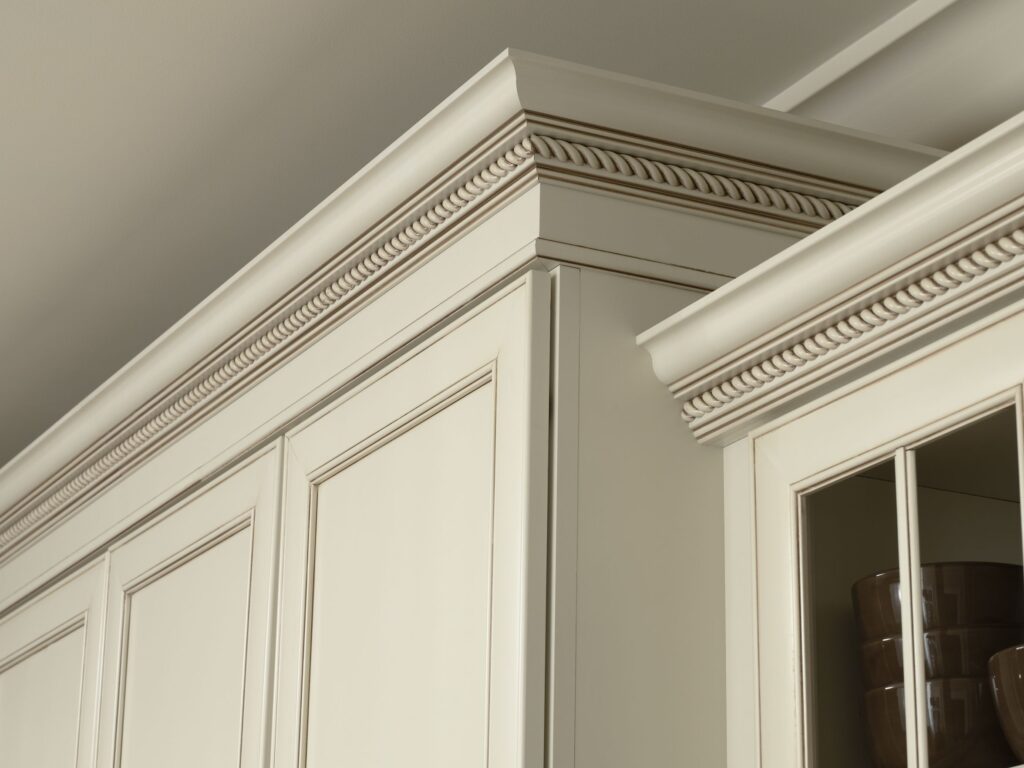
Crown molding, often considered a form of art, is a decorative trim that adorns a room’s top edge of walls, cabinets, or other architectural elements. It is a graceful transition between the vertical surfaces (walls or cabinets) and the horizontal ceiling, adding character and elegance to the space.
In my home, I’ve always been fascinated by the intricate patterns and designs of crown molding, which can turn an ordinary room into an extraordinary one.
Common Choices for Crown Moldings
When choosing the right material for your crown molding, several options are available, each with its unique features and benefits. Here are some common materials used for crown moldings:
- Wood: You can easily spot traditional and timeless wood crown moldings in classic homes. You can paint or stain to match your existing decor, and they offer a warm, natural look. I opted for solid oak crown molding in my own kitchen, which beautifully complements the wooden cabinets and adds a touch of rustic charm.
- Medium-Density Fiberboard (MDF): MDF is an engineered wood product that has gained popularity due to its affordability and versatility. It can be easily cut and shaped into various designs and is resistant to warping. Since MDF crown moldings come pre-primed, they are ready for painting in any color you desire.
- Polyvinyl Chloride (PVC): PVC crown moldings are lightweight, durable, and moisture-resistant, making them an ideal choice for kitchens and bathrooms. You can easily paint them to match your interior, and require minimal maintenance.
- Plaster: Plaster crown moldings offer a high level of detail and sophistication, making them perfect for formal or traditional settings. They are typically more expensive and challenging to install, but the results can be breathtaking.
Benefits of Adding Crown Molding to Cabinets
Cabinet crown molding can bring numerous benefits, including:
- Aesthetic Appeal: Crown molding adds visual interest and elegance to your cabinets, creating a more polished and refined look. For example, when I added crown molding to my simple Shaker-style cabinets, it instantly transformed the space, giving it a more upscale and sophisticated appearance.
- Increased Home Value: Crown molding is often associated with high-end homes, so adding it to your cabinets can boost the perceived value of your home. Potential buyers are likelier to appreciate the attention to detail and the luxurious feel that crown molding brings to a space.
- Concealing Imperfections: Crown molding can help hide gaps or unevenness between your cabinets and the ceiling, providing a seamless and finished appearance. In my home, I had a slight gap between the top of my cabinets and the ceiling, which the crown molding effortlessly concealed.
- Personalization: With various materials, designs, and sizes, crown molding allows you to customize your kitchen to suit your taste and style. Whether you prefer a simple, clean look or an ornate, decorative style, crown molding can help you achieve your desired aesthetic.
Tools and Materials Needed
Before diving into the exciting world of crown molding installation, gathering all the necessary tools and materials is essential. Having the right equipment at hand will not only make the process smoother but will also ensure a professional-looking result.
✔Crown Molding
The most crucial material for this project is, of course, the crown molding itself. Choose the right material, design, and size that best suits your kitchen and personal style preferences. Remember to purchase a little extra to account for any mistakes or miscalculations during the cutting process.
✔Measuring Tape
A measuring tape is indispensable when attaching crown molding, as it ensures accurate measurements of the cabinet sections where you will install the molding. Always double-check your measurements to avoid any errors.
✔Pencil
A pencil is essential for marking measurements, guiding cutting lines, and noting any adjustments needed during installation. Opt for a carpenter’s pencil, designed specifically for woodworking projects, and won’t easily break under pressure.
✔Miter Saw
A miter saw is necessary for cutting crown molding at precise angles. It lets you make clean, accurate cuts, ensuring a seamless fit between the molding pieces. Invest in a high-quality miter saw with a sharp blade for the best results.
✔Coping Saw
A coping saw is a small, handheld saw used to cut intricate shapes and curves in the molding, particularly when creating tight joints for inside corners. Its thin, flexible blade allows greater control and precision when cutting along the molding profile.
✔Wood Glue
Wood glue is vital for securing the crown molding to your cabinets and holding the joints together. Choose a durable wood glue that dries clear, ensuring a clean and professional finish.
✔Painter’s Tape
Painter’s tape is handy for temporarily holding the molding in place while the wood glue dries, especially at the corner joints. You can also use it to mask off areas you don’t want to paint or stain when finishing the molding.
✔Nail Gun or Hammer and Finishing Nails
A nail gun or a hammer and finishing nails are essential for attaching the crown molding to the cabinets. A nail gun allows for faster and more accurate installation, while a hammer and finishing nails offer a more traditional approach. Either way, nail through the thickest part of the molding and into the cabinet frame for maximum support.
✔Sandpaper
Sandpaper is crucial for smoothing rough edges, seams, or imperfections in crown molding. Opt for fine-grit sandpaper (180 to 220 grit) to achieve a smooth and even surface without damaging the molding.
✔Caulk and Caulk Gun
Caulk and a caulk gun are essential for filling gaps between the crown molding and the cabinets or ceiling. Choose a paintable caulk that matches the color of your molding for a seamless, professional finish.
✔Paint or Stain (Optional)
Paint or stain is optional but highly recommended to match the crown molding to your existing cabinet finish or add a pop of color. Choose a high-quality paint or stain suitable for the material of your crown molding and apply it evenly for a beautiful, lasting finish.
Step-by-Step Guide on How to Install Crown Molding on Cabinets
Now that we have gathered all the necessary tools and materials, it’s time to embark on the exciting journey of putting crown molding on your cabinets. As someone who has gone through this process, I can assure you that you can achieve a stunning result that will transform your kitchen with patience, precision, and attention to detail.
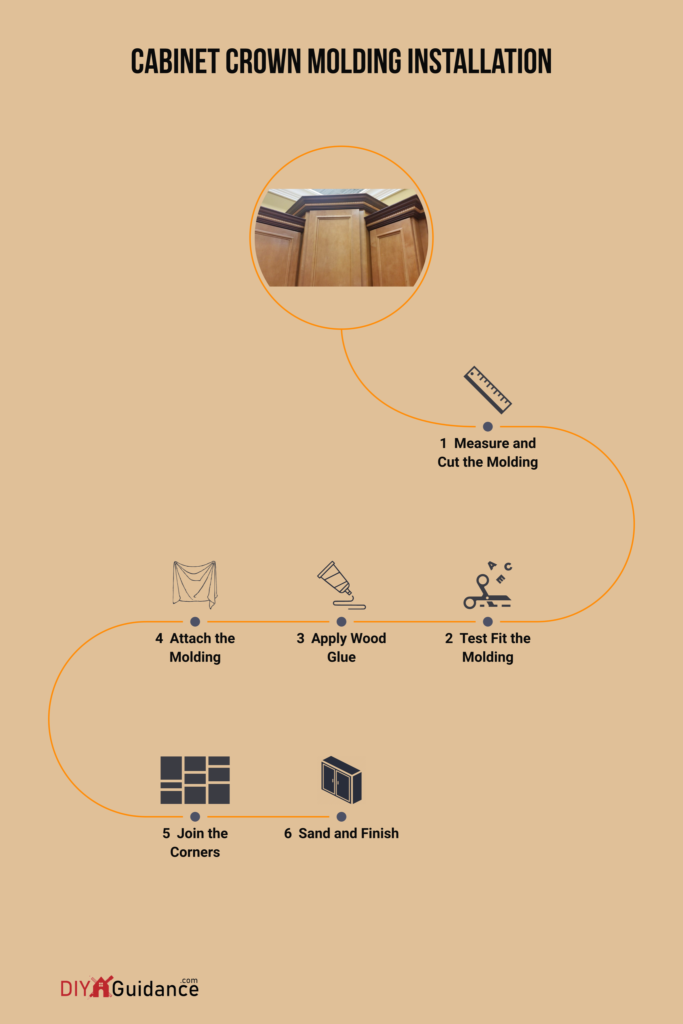
1️⃣Measure and Cut the Molding
The first step in adding crown molding is to measure the length of each cabinet section where you will install the molding. Using your measuring tape and pencil, take accurate measurements and mark them on the molding pieces. Remember, precise measurements are critical for a seamless fit.
Next, set up your miter saw at a 45-degree angle and cut the molding pieces according to the marked measurements. Remember that the angles should be cut in the correct orientation to ensure proper alignment when joining the molding pieces. For example, if you’re cutting the left side of an outside corner, the top edge of the molding should be longer than the bottom edge.
2️⃣Test Fit the Molding
Before attaching the molding to the cabinets, it’s crucial to test fit each piece to ensure a snug and accurate fit. This step allows you to identify any adjustments needed before permanently securing the molding. Place each cut piece of crown molding along the top edge of the corresponding cabinet section and check for proper alignment. If you notice any gaps or misalignments, make the necessary adjustments using your miter saw. In my own experience, I had to make a few minor tweaks during this step, but it was well worth the effort for a flawless final result.
3️⃣Apply Wood Glue
Once you’re satisfied with the fit of the crown molding pieces, it’s time to apply wood glue to secure them in place. Wood glue adds strength to the bond between the molding and the cabinets and helps hold the joints together for a seamless appearance.
Apply a thin, even layer of wood glue along the backside of the crown molding, focusing on the areas that will contact the cabinet. Be careful not to use too much glue, as it may squeeze out when the molding is pressed against the cabinet, creating a messy appearance. When I installed my crown molding, I found that using a small brush or my fingertip to spread the glue allowed for better control and coverage.
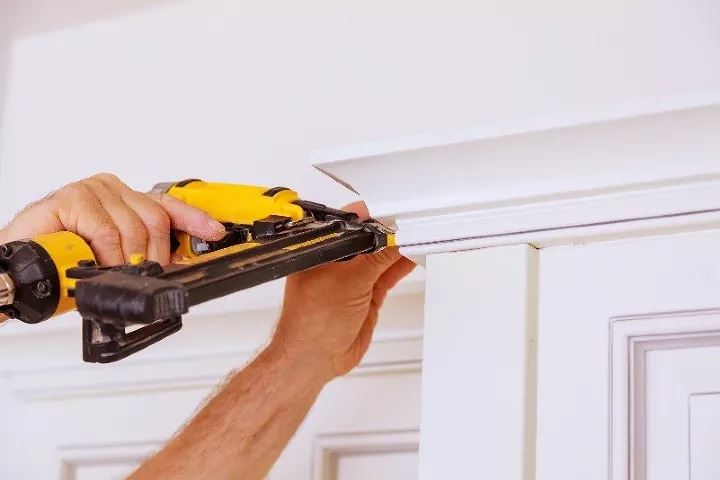
4️⃣Attach the Molding
With the wood glue applied, it’s time to attach crown molding to your cabinets. Carefully align the molding with the cabinet’s top edge, ensuring it is level and properly positioned. Once confident in the placement, use a nail gun or hammer and finish nails to secure the molding.
Be sure to nail through the thickest part of the molding and into the cabinet frame for maximum support. In my installation, I opted for a nail gun, which allowed for a faster and more accurate attachment. However, a hammer and finishing nails will also do the job effectively.
5️⃣Join the Corners
Creating seamless corner joints is essential for a professional-looking crown molding installation. The process differs for inside and outside corners, so let’s discuss both:
Inside Corners: Use a coping saw to carefully cut along the molding profile for inside corners, creating a tight joint. Hold the coping saw at a slight angle to ensure a proper fit, and take your time to follow the contours of the molding precisely. When I first attempted this, I practiced on a scrap piece of molding to perfect my technique before working on the actual pieces.
Outside Corners: For outside corners, miter the ends of the molding at a 45-degree angle using your miter saw. It will create a clean, tight joint when you combine the two pieces. Apply wood glue to the mitered edges and press them firmly, ensuring proper alignment.
Once you have joined the corners, secure them with painter’s tape until the glue dries. It will help maintain the proper position and alignment while the glue sets.
6️⃣Sand and Finish
The final step in adding crown molding to your cabinets is sanding and finishing. This step ensures a smooth, polished appearance and allows you to customize the molding to match your existing cabinet finish.
Start by lightly sanding any rough edges or seams using fine-grit sandpaper. Be gentle to avoid damaging the molding, and focus on areas where you glue the joints or use the nails. In my project, I found that wrapping the sandpaper around a small wooden block made achieving a smooth, even surface easier.
Next, fill gaps between the molding and the cabinets or ceiling with caulk, using a caulk gun for precise application. Smooth the caulk with your fingertip or a damp cloth to create a seamless appearance.
Finally, apply paint or stain to match your existing cabinet finish or add a pop of color. Choose a high-quality paint or stain suitable for the material of your crown molding and apply it evenly using a brush or roller. Allow the paint or stain to dry thoroughly before removing any painter’s tape and admiring your stunning new kitchen cabinets.
Pro Tips for a Professional Finish
As you embark on your crown molding journey, I’d like to share some pro tips I’ve learned. These insider secrets will help you achieve a professional finish and make the installation smoother and more enjoyable. Let’s explore these valuable tips to ensure your crown molding project is successful.
📌Practice Cutting Angles and Corner Joints
One of the most challenging aspects of adding crown molding is mastering cutting angles and corner joints. Precise cuts are essential for creating seamless connections between the molding pieces, ensuring a professional and polished appearance.
Before tackling your actual project, I highly recommend practicing your cutting skills on scrap pieces of molding. It will help you become familiar with the miter saw, improve your technique, and gain confidence in creating clean, accurate cuts. In my own experience, this practice paid off immensely, as I achieved tight, flawless corner joints in my cabinets.
📌Proper Miter Saw Setup and Blade Maintenance
A well-maintained and properly set up miter saw is crucial for precise cuts when working with crown molding. Here are some tips to ensure your miter saw is in top-notch condition:
Choose the right blade: Opt for a high-quality, carbide-tipped blade with 60 to 80 teeth for smooth, clean cuts through various crown molding materials. When I installed my wooden crown molding, I chose an 80-tooth blade, providing excellent results without chipping or tear-out.
Ensure proper blade alignment: Periodically check the alignment of your miter saw blade to ensure that it is square with the table and fence. Misaligned blades can result in inaccurate cuts and poorly fitting joints.
Keep the blade sharp: A dull blade can cause rough, uneven cuts and generate excessive heat, which may damage the molding material. Regularly inspect your blade for signs of wear, and have it sharpened or replaced as needed. I made a point to do this before starting my crown molding project, which significantly impacted the quality of my cuts.
Secure the molding: When cutting crown molding on a miter saw, you must hold it securely to prevent movement and ensure accurate cuts. Use a crown molding jig or create a custom support system to hold the molding at the proper angle against the fence and table. It will help you achieve precise cuts and minimize the risk of mistakes.
📌Using a Nail Gun for Faster Installation
While you can use traditional hammers and nails to secure crown molding, a nail gun offers several advantages that make the installation process faster and more efficient. Here are some benefits of using a nail gun for your crown molding project:
Speed: A nail gun allows you to quickly drive nails into the molding and cabinets, significantly reducing the time needed to complete the installation. In my experience, using a nail gun saved me hours compared to using a hammer and nails.
Accuracy: With a nail gun, you can easily control the depth and placement of the nails, ensuring a secure and precise attachment of the crown molding. It reduces the risk of splitting or damaging the molding during installation.
Reduced effort: Placing crown molding can be physically demanding, especially when using a hammer and nails. A nail gun requires less effort, minimizing the strain on your arms and hands during the project.
Professional finish: Nail guns drive nails flush with the surface of the crown molding, creating a clean, professional appearance. It eliminates the need for countersinking the nails, which can be time-consuming and challenging to do by hand.
When choosing a nail gun for your crown molding project, opt for a pneumatic or cordless model with an adjustable depth setting. It will allow you to achieve the optimal nail depth for a secure and polished installation.
📌Importance of Patience and Precision
Crown molding installation is a process that requires patience and precision. Rushing through the project or cutting corners can lead to unsatisfactory results and may require redoing the entire installation. Here’s why patience and precision are crucial to your crown molding success:
Measuring and cutting: Taking the time to accurately measure and cut crown molding ensures a seamless fit and minimizes the risk of mistakes. Double-checking measurements and making precise cuts will save you time and frustration in the long run.
Corner joints: Crafting flawless corner joints is essential for a professional-looking installation. Patience and precision are required when cutting the angles and fitting the pieces together, as even the slightest misalignment can create gaps or unsightly seams.
Finishing touches: Sanding, caulking, and painting or staining the molding require careful attention to detail for a polished result. Taking your time during these final steps will ensure a smooth, clean appearance that enhances the overall look of your cabinets.
Frequently Asked Questions
Q: What type of crown molding is best for kitchen cabinets?
A: The best type of crown molding for cabinets depends on your personal preference, budget, and overall style of your kitchen. Wood and MDF moldings offer a traditional look and can be painted or stained to match your cabinets, while PVC moldings are more moisture-resistant and require less maintenance.
Q: How much does it cost to add crown molding to cabinets?
A: The cost of adding crown molding on cabinets varies depending on the material used, the complexity of the design, and whether you do it yourself or hire a professional. On average, expect to pay between $3 to $15 per linear foot for materials and an additional $2 to $8 per linear foot for labor if hiring a professional.
Q: Can I add crown molding on cabinets with uneven ceilings?
A: You can add crown molding on cabinets with uneven ceilings. While uneven ceilings can make the installation process a bit more challenging, achieving a polished and professional look is still very possible. One great option is flexible crown molding, which can bend and adjust to the ceiling’s shape. Another possibility is to create a custom template that follows the contours of the ceiling and use that as a guide while cutting the molding.
Q: How do I choose the right size crown molding for my cabinets?
A: The key is to consider the size and style of your cabinets and the overall mood you want to create within the space. If you have larger cabinets, you may want to opt for wider molding for a grander, more sophisticated look. Alternatively, a more delicate molding can add an elegant touch without overwhelming the space if you have a smaller kitchen. It all comes down to personal preference. So, take some time to explore different options, and choose the crown molding that speaks to your unique style and vision.
Final Thoughts
Adding crown molding to your kitchen cabinets can be a rewarding and transformative project. As someone who has gone through this process, I can attest to the sense of accomplishment and pride that comes from seeing the stunning results of your hard work.
By gathering the right tools and materials, following a step-by-step guide, and incorporating pro tips into your installation process, you can achieve a professional finish that elevates the look of your kitchen. Patience, precision, and attention to detail are key to mastering this art.
Don’t be afraid to make mistakes or take your time; these experiences will only help you grow and refine your skills. Embrace the journey, and in the end, you’ll have a beautifully transformed kitchen space that you can enjoy for many years.
