Have you ever walked into a room and been completely mesmerized by a beautiful flower wall?
However, the price tag on those flower walls can be pretty steep. Well, I have a solution: create your very own DIY flower wall! All you need is some creativity, tools, and patience to create a floral masterpiece that will impress anyone who enters your home.
The process might be challenging, but the result of seeing your flower wall displayed proudly will be worth it. Whether you’re looking to add some flair to your home décor or create a picture-perfect background for your next event, a DIY flower wall is a project sure to give you a sense of accomplishment. So let’s get started on this DIY journey!
What Exactly Is a Flower Wall?
Screencap from Instagram
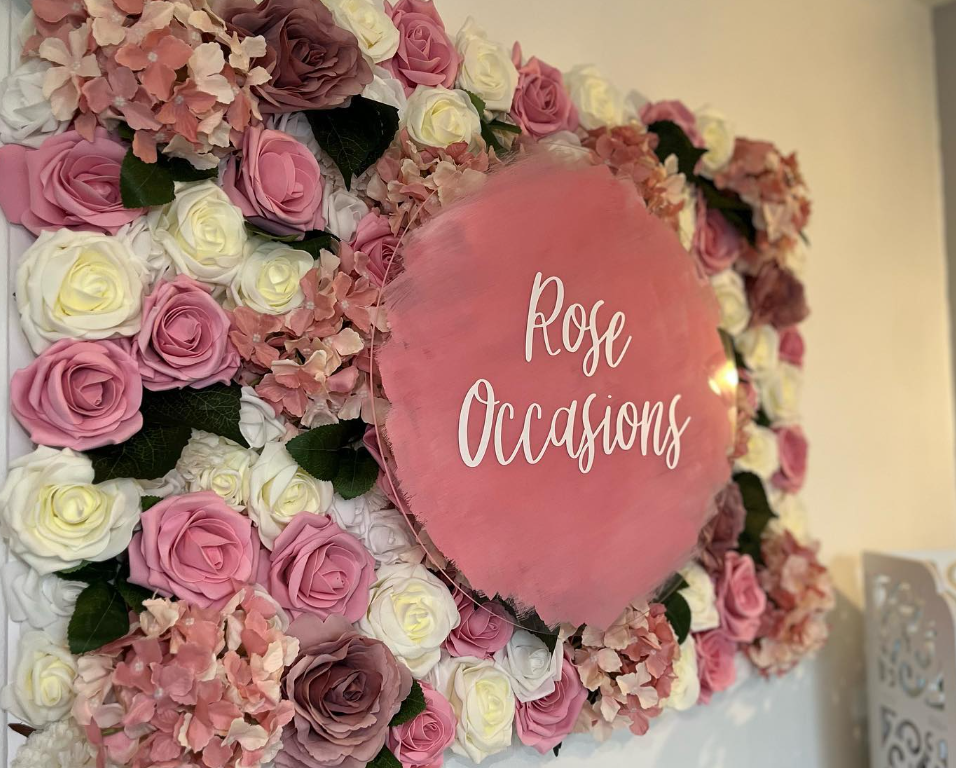
A flower wall is a decorative backdrop made from various flowers and foliage. They can be of different sizes and shapes, and you can choose to hang them or set them up as a freestanding piece. Flower walls are beautiful and immersive, creating a tropical, relaxing vibe while providing an incredible background for your pictures. Flower walls suit various events, including wedding flower wall backdrops, baby showers, corporate events, and birthdays.
Creating a flower wall is all about customization, so you can combine a variety of flowers and foliage according to your preference. You can use fresh or artificial flowers, depending on your budget and the availability of fresh flowers. Some popular flowers used to make a floral wall include roses, hydrangeas, peonies, carnations, and daisies. Adding foliage such as ferns, eucalyptus, or ivy is a great way to add texture and depth to your flower wall.
How to Make a DIY Flower Wall
I will show you how to create your charming flower wall without burning a hole in your pocket. With a few simple steps, you can transform any dull wall in your house into a vibrant and lively space.
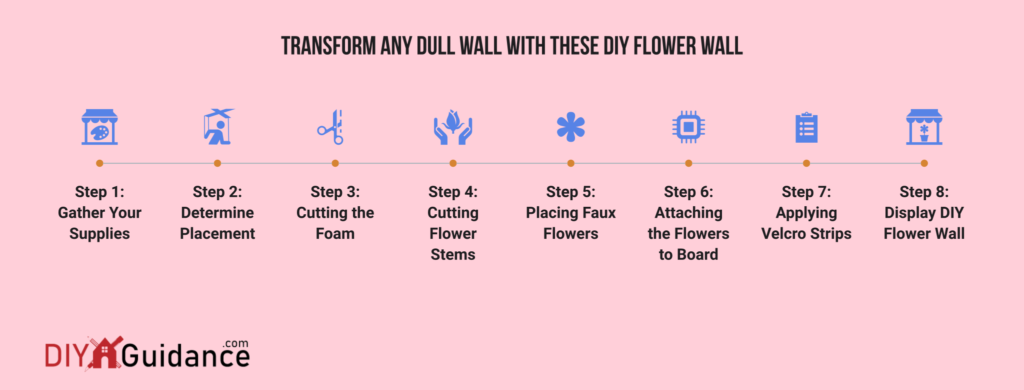
Step 1: Gather Your Supplies
Before you begin, you need to gather your supplies. Here’s what you’ll need:
- Scissors
- Glue gun
- Wire cutters
- Pencil
- Measuring tape
- 1 bag of faux flowers
- 1 rectangular foam board
- 6 velcro strips
Step 2: Determine Placement
This step is critical because your DIY flower wall’s location will affect how well it complements your event or space.
Measure the Width and Length
First, measure the length and width of the space using a measuring tape. This step is essential, especially if you plan to create a larger DIY flower wall. The size of the flower wall should complement the space that you have chosen for it. Ensure that the size fits the width of the wall you’ll be placing it on and that it doesn’t take up too much of the surrounding area.
Wall Location
If you want to add some life to a room, then the wall’s position should be visible so it becomes a focal point in the space. If you’re creating a flower wall for a specific event, such as a photo shoot, place it in an area with sufficient lighting and space for your subjects to pose comfortably.
Overall Aesthetic Style
If you’re using the flower wall as a backdrop for an event, ensure that it complements the event’s theme. When creating a DIY flower wall for your home, pick a color scheme matching your room’s decor. On the other hand, if you want to add vibrance and contrast, consider a contrasting color scheme.
Installation Process
Generally, flower walls can be heavy when fully complete, so look for a solid wall to attach it to. In addition, check whether the wall can handle the flower wall’s weight. Some walls might require additional reinforcement to support the flower wall’s weight, but knowing the installation process beforehand will help you determine placement.
Step 3: Cutting the Foam
Cutting the foam board is essential to creating your DIY flower wall. Getting the dimensions right is vital so that your flowers fit perfectly. Once you have the correct dimensions, it’s time to cut the foam board. You can use a sharp cutter or a saw to trim your foam board to size. Make sure you cut it as straight as possible to get a clean, uniform look.
It’s worth noting that you can skip this stage if it fits the space you intend to install it in. However, if you need to cut your foam board, take your time and be careful not to make any mistakes. Foam boards are easy to cut, but they will leave a mess. Therefore, it’s essential to make sure you have a clean workspace.
Don’t worry if you’re not confident in your cutting skills; foam boards are relatively cheap to replace. So, if you make a mistake, you can easily go back and re-cut the board to the correct size.
Step 4: Cutting Flower Stems
It is essential to take precautionary measures while cutting flower stems. You might hurt yourself or ruin your faux flower altogether. Use a sharp pair of scissors or gardening shears while cutting the flower stem. If you’re using wire-stemmed faux flowers, use your wire cutters to trim them, leaving an inch or less of the wire. It is essential to note that you don’t want to cut too much of the stem, as it will be difficult to attach to the board.
Cut the Stems Before Placing them in Water
It’s a good idea to cut the stems of your flowers just before placing them in water. That way, your flowers are fresher for more extended periods, thus increasing their lifespan. If you cut them beforehand, the stem will start to dry up and reduce water flow to the flower, leading to faster wilt.
Cut the Stems at an Angle
Doing so will help your flowers absorb water and nutrients better. The water flow will not get disrupted if you cut your stems properly. To achieve this, simply use sharp scissors or garden shears as the tool of your preference, and make around a 45-degree angle cut.
Purchase Stem Wire
If you’re using stemless faux flowers, do not worry. You can still attach your flowers to the board. Purchase some stem wire from your local craft store. Wrap the wire around the bottom of the flower and make sure it’s secure. Then, attach it to the board by drilling a small hole and poking the wire through it. Once the stem wire is in place, attaching the flowers to the board will be easier.
Ensure Correct Height Before Attachment
It’s essential to ensure your flowers are at the correct height before attaching them to the board. Use a ruler or a measuring tape to ensure they’re all at the right height. Make sure that the flowers’ height is constant throughout the flower wall. This will ensure that your DIY flower wall looks uniform and professional-looking.
Step 5: Placing Faux Flowers
Once the materials are ready and the flowers are cut, it’s time to attach them to the board.
Arrange Them in Place
In order to begin, you’ll want to take your faux flowers and arrange them in place before attaching them to the foam board. This is essential because it allows you to create your desired design before committing to a specific arrangement. Plus, you can rearrange the flowers until you get the desired look. If you’re using multiple types of flowers, it’s easiest to start by placing the larger ones first. It ensures that they won’t get covered up by the smaller ones.
Layer the Flowers
The next important step is to layer the flowers. You don’t want all the flowers to be close together, which can create a flat appearance. Instead, you want some flowers in front and some in the back to create a sense of depth. You can do this by placing some flowers directly on the foam board and others on top of the first layer. This will make your flower wall look more realistic and beautiful.
Add Faux Greenery
Adding faux greenery can make a world of difference. Greenery adds texture, color, and a natural feel to your flower wall. It’s best to add greenery after placing your flowers on the foam board. We recommend placing the greenery behind the bigger flowers and on top of the smaller ones. This will create a layered look. You can also use floral wire to attach the greenery to the foam board, just like you did with the flowers.
Add Some Finishing Details
It’s all in the details. You can add some finishing details to your DIY flower wall by placing smaller flowers between the larger ones. This can add a pop of color and break up empty spaces on the foam board. You can also use floral tape to bundle up smaller flowers, creating a flower bundle. You can place these flower bundles in various spots on the foam board, creating interest and dimension.
Step 6: Attaching the Flowers to Board
Securing your chosen faux flowers onto the foam board for your flower wall may seem daunting, but it’s quite easy.
Prepare Your Flowers
Before attaching the flowers to your foam board, it’s essential to prepare them first. Trim the stems to ensure that they fit nicely into the foam board. If the stems are too long, they might poke out at the back; if they are too short, they might not be secure enough. Additionally, make sure that any extra leaves and petals are removed. It will make the next step much easier.
Punch a Hole
Punching a hole in the foam board is the best way to attach your flowers securely. These holes enable the flowers to be held in place while creating a more natural look. Use scissors or any sharp object to create a hole in the foam board. The hole should fit the flower stem tightly but not too snugly.
Push the Flowers through The Foam
Now it’s time to attach the flowers to the foam board. If your faux flowers have wire stems, you may simply push the stem through the hole in the foam board. If pushing them through the foam board is challenging, try twisting the flower stem gently before pushing it into the foam.
Use Hot Glue
However, if your flowers came without stems, don’t worry; there’s still a way to attach them to the foam board! All you need to do is attach a dab of hot glue to the back of the flower and press it onto the foam board. Before proceeding to the next step, you’ll need to ensure the hot glue has completely dried.
Fill in the Blank Spaces
After attaching your flowers to the foam board, there may still be some blank spaces that need to be filled in. You can add extra flowers, leaves, or even vines to enhance the overall look of your DIY flower wall. Filling in the blank spaces will give your DIY flower wall a fuller and more beautiful look.
Step 7: Applying Velcro Strips
First, you’ll need to vertically attach your velcro strips to the back of your foam board. We recommend using at least three strips for a secure hold but feel free to add more depending on how heavy your board is.
Once you’ve attached your strips, hold up the flower board against the wall where you plan to hang it and mark the spots on the wall where the strips will align. This will help ensure you hang the board correctly and avoid unwanted mistakes.
Now it’s time to apply the other half of the velcro strips to the wall itself. Peel off the sticker backing from the strips and align them with the marks on the wall. Press the strips firmly against the wall to ensure a strong hold.
All that’s left to do now is attach your flower wall to the velcro strips on the wall. Having a friend help with this step is highly recommended to avoid any mishaps. Press firmly to ensure a solid grip once the board is placed onto the strips.
Step 8: Display DIY Flower Wall
At this point, your DIY flower wall is ready to be displayed and enjoyed. Once you’ve installed your flower wall on the wall, the next is to add the lighting. Indoor lighting can be used for events, while Christmas lights are suitable for outdoor settings. You could hang string lights all around the wall or attach them to the back of the wall. This is an excellent option for events held in the evening. Integrated led lighting is also a great way to bring out the brilliance of your DIY flower wall.
These are the steps to creating a beautiful and eye-catching DIY flower wall. Whether for your home or an event, this project will surely bring a touch of elegance and sophistication to any space. Check out the video below for flower wall tutorial!
DIY Flower Wall Ideas

Screencap from Instagram
If you’re looking for inspiration for your DIY flower wall project, I have compiled a list of the best ideas for creating the perfect one.
1: The Classic Rose Wall
A rose wall is the perfect choice for a classic and romantic look. To make your own, you will need fake roses in various shades of pink and red, a foam board or canvas, a hot glue gun, and some greenery for added depth. Simply arrange the roses in a random pattern on the foam board or canvas, securing each stem with hot glue. Layer the roses and greenery until the desired effect is achieved. Voila! It will create a stunning rose wall that will make a beautiful backdrop for photos or a lovely statement piece for your living space.
2: The Boho Chic Wall
If you want something more whimsical and boho-inspired, try a flower wall made from dried flowers and pampas grass. You will need a wooden dowel rod, twine, floral wire, dried flowers, and pampas grass to make this beautiful wall. Simply tie the twine to the dowel rod and attach the wire to the twine. Thread the dried flowers and pampas grass through the wire, securing them with more wire. Hang the dowel on the wall and enjoy your boho-chic masterpiece!
3: The Rustic Wall
Consider using fresh greenery and wildflowers for a rustic and natural-looking flower wall. This wall is perfect for outdoor wedding decorations or backyard parties. You will need chicken wire, wire cutters, gloves, assorted greenery, and flowers to create it. Cut a piece of chicken wire to the desired size and shape, wearing gloves to avoid prickles. Layer the greenery and flowers onto the wire, securing each stem with wire. Hang your rustic wall and enjoy the beauty of the outdoors indoors.
4: The Ombré Wall
Add some drama to your flower wall with an ombré effect. To create this effect, you will need fake flowers in various shades of the same color, a foam board or canvas, and a hot glue gun. Starting with the darkest shade of flowers at the bottom, work your way up to the lightest shade at the top. Secure each stem with hot glue and layer the flowers until the ombré effect is achieved. This wall will make a stunning addition to any room or event.
5: The Floral Monogram Wall
For a personalized touch, create a flower wall using a monogram letter of your choice. You will need a wooden or paper mache letter, fake flowers, a hot glue gun, and wire cutters. Arrange the flowers onto the letter, securing them in place with hot glue and trimming any excess stems with wire cutters. Hang up your floral monogram and enjoy your personalized creation!
Frequently Asked Questions
What is the cheapest way to make a flower wall?
I found out that the cheapest way to make a flower wall is to use faux flowers. Yes, those plastic ones that you can get at the dollar store. By the time you buy fresh flowers, floral foam, and a frame to attach everything to, you’re looking at spending a good chunk of change. But with faux flowers, you can buy them in bulk, reuse them for future events, and get the same stunning effect on a budget.
How many flowers will I need for a flower wall?
As someone who has taken on this challenge before, let me tell you that it all depends on your desired size and density. If you’re going for a minimalistic look, you can get away with fewer flowers, but if you want a statement wall, you might need to invest in a couple more. Don’t forget to consider the type of flowers you also want to use. Some flowers are larger than others and might cover up more space, so keep that in mind while planning.
Are flower walls still popular?
From my personal experience, the answer is a resounding yes. I recently attended a wedding where the entire photo booth was decked out in a gorgeous flower wall, and let me tell you, people were lining up for it. Whether it’s for weddings, baby showers, or even just to add some extra pizzazz to your living room, flower walls are a timeless decorative choice that will always make a statement.
How do you attach flowers to a backdrop?
It’s important to choose a sturdy backdrop material that can hold the weight of the flowers – I’m talking plywood, mesh, or foam boards. Once you’ve sorted that, you can use floral wire to attach the blooms or opt for a trusty hot glue gun. Just be sure to lay everything out beforehand and plan your layout before committing to anything – trust me, it will save you a lot of headaches (and wasted flowers).
How to make a 3d flower wall?
First, you’ll need a base. I prefer using foam board, but you can also use plywood or any other sturdy material. Next, cut out your flower templates from cardstock or construction paper. You can find free templates online or create your own. Once you have your templates, trace them onto your chosen paper and cut them out. The fun part comes next: layering your flowers to create the 3D effect! I like using hot glue and foam tape to secure the flowers on the board. You can also use floral wire for a more permanent look. Once everything is in place, you can hang your 3D flower wall and enjoy the beautiful effect!
How do I preserve a flower wall?
If you want to keep your flower wall looking great for as long as possible, there are a few things you can do:
- Ensure it’s stored in a cool, dry place away from direct sunlight.
- Try to use faux flowers so they don’t wilt over time.
- If you’re using real flowers, mist them with water every few days to help keep them looking fresh.
Your flower wall can last for years with the right care and maintenance.
Final Words
As I take a step back to admire my newly completed DIY flower wall, I can’t help but feel a sense of pride and accomplishment. It took time, patience, and a lot of creative energy to bring this project to life, but it was all worth it. No matter your budget or skill level, creating a flower wall is a great way to add beauty and elegance to any space. With these guidelines in hand, I have no doubt you’ll be able to create an eye-catching design that will make even the pickiest of critics happy.
